by Molly Kuchler
Research and a Road Map
The documentation of other projects concerning polychromy reconstruction tend to focus on the scientific analysis of pigments and what the final products look like. This is understandable, but it tends to cloud the fact that this sort of project can be done more cheaply, easily, and in less time than most people imagine, providing that some key information is accessible enough to those unfamiliar with the world of artistic digital technologies. But because few projects also document or publish the tech, software, and methods used to create digital reconstructions, or fully explain the back-end decisions they made as they created and took steps to display the reconstructions, anyone beginning a project like this one has to start basically from scratch every time. In addition, the documentation of methodology that is published may quickly go out of date- a problem most Classicists do not often run into. So when Laura approached me about the project, we started from the desired end product (a projection mapping) and worked backwards. As I created our workflow, I realized that I spent a large amount of time simply orienting myself in order to find the information I wanted, but that others may not have the time and ability to do this. It is important to me that our project be easy to replicate, and so my purpose in this blog post is to document our workflow and to lay out the basic decisions and research that went into it, so that others might have somewhere to start if they choose to embark on a similar project in the next few years.
Photogrammetry and 3D Models
Obtaining the models for the reconstruction began under unusual circumstances since we had no chance of accessing the plaster replicas that we wanted to focus on due to the ongoing pandemic. In a very real test of open-access principles, free and accessible preexisting digital resources saved the day. We found the file we needed, which we would have usually created ourselves using photogrammetry, of the Sandalbinder relief on an accessibility-forward website myminifactory, which is full of free and low-cost 3D objects and assets. Our particular relief was uploaded by the Scan The World project, which encourages submissions of scanned statues and monuments that become freely available and easily accessible for various academic and artistic purposes.
The Borgia Stele, being less well known, was not available through the Scan The World project, but luckily for us it turned out that a previous photogrammetry workshop held in Bryn Mawr’s Digital Media Lab had chosen this replica as a practice subject. One of my fellow graduate students (thanks, Matt!) sent us the photos he had taken of the relief and I was able to create an .stl file from these using the photogrammetry software Agisoft Metashape. Something that, in a normal time, would have been simple (using photogrammetry to create 3D meshes of objects we had access to) came together quickly in an unusual time purely as a result of the efforts of others to put photogrammetry and 3D assets in the mainstream as accessible and easy to use technologies. Talk about a practical lesson in digital ethics!
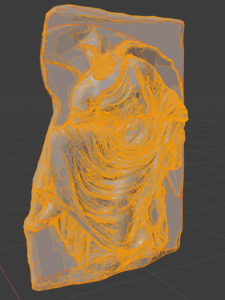
The result of .stl files (which contain “vertex” and “edge” data of three-dimensional objects and are commonly used for 3D printing) are digital models (also known as “meshes”), which are the basis of any 3D art and have a few characteristics which make them easier or more difficult to work with. The number of vertices present in the mesh may make it more complex and accurate to a real surface, however more vertices and faces (also called polygons in this context) can make it more difficult for a computer to process them and even for a human to work with them in detail. There are modern workarounds to this problem (the keywords for those being “texture mapping” and “normal mapping” which are often used in video games to give the illusion of detail without the extra loading times), but since our aim was to project onto an already complex model, there was not much need to create a perfectly accurate digital version. Instead I strategically reduced the number of faces in both meshes once we had them to approximately 2/3rds-1/2 of the initial count, retaining complexity only where we needed it most (from somewhere around 150,000 faces to 90,000 for the Sandalbinder, and 90,000 to 70,000 for the Borgia Stele). For this I used Blender, the free and open-source 3D animation and design software which was the main driver of this project, about which I will go into more detail in its own section.
Had a means for obtaining both models through photogrammetry and scanning not been available to us, there were two methods which would could have been attempted next. The first is that exhibited by the project “Nike is now”, which involves digital sculpting to recreate- from scratch- the three-dimensionality of sculpture in relief. There are many pros to this method, which can create an accurate mesh that retains complexity only where it is needed. However, the modeling done in the project linked above was done by a professional artist, John Goodinson, whose work has appeared across time and space in various forms of media (including James Cameron’s ALIENS). While our project was much smaller than Nike is Now in scale, the learning curve for a software like Blender in addition to copying high-quality sculpture digitally would have required me to compound the process of acquiring the skills of a veteran professional artist and digital designer into two months. The other method would have been the one showcased by the 2015 “Color the Temple” project at the Metropolitan Museum of Art in NYC. In this project, an outline was created in Adobe Illustrator by drawing over a picture of the inscribed hieroglyphic text and images which were then colored and projected back onto the Temple of Dendur. This may have worked for the Borgia Stele, which is carved in fairly low relief. But the high relief of the Sandalbinder would have made it difficult to align the colors accurately onto the sculpture in the projection. How much more difficult it actually would have been is a question I still, unfortunately, cannot answer. Because of the online and preemptive nature of our Coloring the Past project, I wanted our final product to be as projection-friendly as possible, which ended up excluding this method in favor of photogrammetry.
Blender
The most time consuming part of our project was teaching ourselves how to use Blender. However, it was also, I believe, the most rewarding. Blender is the crown jewel of free and open source software- but what does that mean? It means that Blender is run entirely on donations (or the “pay what you can” model), and that the code for the software is available to anyone who wants it- meaning anyone with an understanding of how to code can build extensions and new features and likewise make them publicly available. Its development is a crowd-sourced effort, and the resultant program allows one to create feature film-quality animations, or just complete simple projects like our own, without paying a dime for the software. An artist’s dream. The learning curve is steep, however, and the overwhelming amount of features and jargon can be quite overwhelming (without even getting into the controls themselves). Here, the YouTube creator Blender Guru’s Beginner Tutorial was a lifesaver. Create a donut and coffee cup in six hours of video tutorial. Perhaps rip out some of your hair in the process. But on the other side, you gain a very basic understanding of Blender’s functions.
Beyond the basics, I found that the biggest challenge was identifying the right jargon and process for the effects that we needed, so that I could more efficiently search for tutorials. The “scene” for Blender is, frankly, huge. A vast network of resources is spread over the internet (Youtube, Blender StackExchange, Reddit, etc.) and it can be hard to orient yourself. Of course, I’d need to make a tutorial of my own to pass on the full effects of the research that I did, so instead I will lay out some of the main features of Blender that we used, what they are called, and what they do:
- UV Unwrapping: Like unwrapping a chocolate bunny and flattening the wrapper into a square, UV unwrapping the meshes allowed us to paint a 2D surface that represents points on a 3D object. This allowed us to get precise detail easily, rather than worrying about coloring “outside the lines” on the faces of the reliefs.
- Texture Painting: Texture painting works like spraypaint and a stencil. We uploaded the pigment swatches from ColourLex, in order to get a realistic texture and hue. These acted as the “stencil”, which we colored through to apply the color to pieces of our unwrapped mesh. We were able to control the percentage transparency of each color in order to combine them and create new shades. While the process is very artificial, using the actual pigment swatches was as close as we could get to painting the statue itself, and when combined as our research indicated, these overlapping pigments created very natural and realistic colors. See the Reconstruction page for each relief for more information on this process.
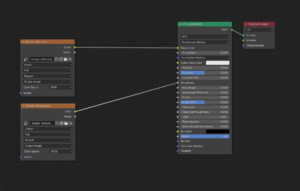
- Texture Nodes: Texture nodes control the material properties of the objects in Blender, mostly by changing how light interacts with surfaces. Using a combination of Texture Nodes and Texture Painting, we could apply a glossy sheen to only part of our relief, according to our research. For more on this specific process, this tutorial is worthwhile (note: this tutorial/explanation is of an intermediate level).
- Animation: Animation in Blender often feels like an entirely different program with all new jargon, and as such I have barely been able to dip my toes into the basics. However, we were able to animate the reliefs disappearing and reappearing so that when we project them onto the physical objects, there will be some time to appreciate the colors fading into the colorless statues that we are so unfortunately familiar with today.
These explanations are clearly not exhaustive, but the effect of having some important terms and concepts in one place cannot be understated. At the very least, knowing what to Google can be half the battle of independent research in the modern day.

Previous
Next
Projection Mapping
Projection mapping, the term used for the art and technique behind using a projectors to “paint” images and videos across abnormal surfaces, can be most often seen in an entertainment capacity. You might have seen it used to project patterns onto clothing, such as at Katy Perry’s performance at the 2015 Super Bowl Halftime show, or on the side of Saks Fifth Avenue during their annual holiday light display. It is often used at EDM shows in coordination with an artist’s performance, or in modern and abstract art exhibits. However in the past few years, it has begun to be used as a technique for exhibits showcasing ancient and premodern material as well. Projection mapping’s benefits, as a non-destructive, modular, and often interactive technique for reconstruction, are significant.
For our reconstruction, we had initially planned to showcase this technique on the replicas of the Parthenon metope slabs which hang in the atrium of Rhys Carpenter Library. Unfortunately, the COVID-19 pandemic got in the way. Although our project was downsized slightly, we were able to go remote and focus on two replicas that hang in the Digital Media Lab within the library instead. While this meant that we could continue with the project, we also had to place certain aspects of our plan on hold. As of now, late July, we have been unable to work directly with our projector or even enter the Digital Media Lab (where our replicas are housed) since March. Because of this, our focus has been to create this website, where our replicas may still be fully available to the public until we can open our exhibit in person. When we are able to set it up, we will be using MadMapper projection software to showcase both reconstructions using just one projector.The Coloring the Past Project has given me, as a humanities graduate student, a series of opportunities that are unusual for someone in my discipline. Not only because digital skills are still bafflingly late in coming to the realm of ancient history, but also because project planning and management are almost never taught in the humanities, no matter how useful they are. I am particularly grateful to Laura Surtees, our Project Manager, for allowing me to tackle this project head on and shore up those two areas of knowledge, and Alice McGrath, our Digital Humanities Technology Consultant, for her help and guidance, and to Vimbai and Mira, our Undergraduate Research Assistants, who worked hard and didn’t complain about me telling them to spend six hours on a digital donut.